Join Us On Telegram Contact Us Join Now!
Posts

How to make Blogger Theme License with Google Sheets and JavaScript

how to make a blogger template license with google sheets and JavaScrip for hose of you who are developing blogger templates and planning to sell them
Hello, everyone! Today on this occasion I will going to share a tutorial about How to make Blogger Theme License with Google Sheets and JavaScript.

Blogger Theme License with Google Sheet


What is license means for blogger theme

As we know the premium templates that we often encounter on average have a license, of course the aim is that the templates made are not misused by irresponsible people, such as distributing them for free or reselling them without the knowledge of the template developer.

For those of you who are developing blogger templates and planning to sell them, it would be nice to first install a license on the template you created before marketing it so you can avoid unwanted things, therefore here I will share How to make Blogger Theme License with Google Sheets and JavaScript.

What is Google Sheets

Google Sheets is one of the features of Google Drive (an unlimited online storage service) developed by the technology company Google.

Most of the workers and students are probably already quite familiar with Google Sheets services. For simplicity, this service is often called Sheets.

The form or format of the spreadsheet itself is practically similar to Microsoft Excel, in that it is composed of columns and rows.

Generally, spreadsheets can be operated online and allow users to edit documents/files in a spreadsheet anytime and anywhere.

How License Works


Before we start with the tutorial, I will discuss a little about how the license works which we will create later, as in general licensed templates use a unique code created by perUsers and 1 license can only be used for 1 domain or 1 blog and if you want to install it on other domain then license code is different again. in most of the licensed templates use "base64 code" like this bGlzZW5zaXRlbXBsYXRla29kZWJh= and the license is active forever the developer does not have access to remove the license that has been given to users because the license does not have a database.

And the method that I will share here is actually the same how it works, but the difference is that we have access to delete user's licenses because we use a google sheet database that will accommodate user's licenses, so when we delete user's data in our spreadsheet, the site / blog users will be redirected to our site. Okay so that's all the difference is ok, let's just start with how to make it below.

How to make Blogger Theme License with Google Sheets and JavaScript

1. First go to Google Drive.
2. Please create a new google spreadsheet by clicking on New then select Google Sheets and then click on blank sheet.


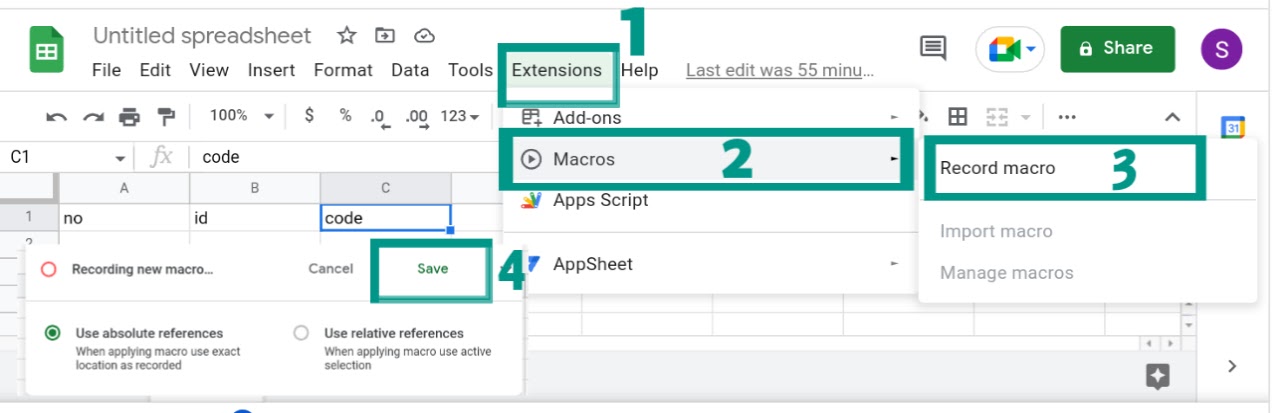
3. Now at the bottom rename the Sheet1 to users. Then add names in columns A1=no, B1=id, C1=code.


4. Now click on Extensions select Macros and then record macro. Then Click on save name it as you wish.


5. Now again click on Extensions select macros then click on Manage Macros. Then you can see your recorded macro. Now click on Edit Script.


6. Then delete default script and paste new script that is given below.
function doGet(e){
var ss = SpreadsheetApp.openByUrl("https://docs.google.com/spreadsheets/d/1OM8TRu0iIJRbDTnVfq24VqdBwljSY_i4HCNcSPsZBuU/edit#gid=0");
var sheet = ss.getSheetByName("users");
return getUsers(sheet); 
}
function getUsers(sheet){
var jo = {};
var dataArray = [];
var rows = sheet.getRange(2,1,sheet.getLastRow()-1, sheet.getLastColumn()).getValues();
for(var i = 0, l= rows.length; i<l ; i++){
var dataRow = rows[i];
var record = {};
record['id'] = dataRow[1];
record['code'] = dataRow[2];
dataArray.push(record);
}
jo.user = dataArray;
var result = JSON.stringify(jo);
return ContentService.createTextOutput(result).setMimeType(ContentService.MimeType.JSON);
}

Change this link https://docs.google.com/spreadsheets/d/1OM8TRu0iIJRbDTnVfq24VqdBwljSY_i4HCNcSPsZBuU/edit#gid=0 with the Google sheet link you created earlier

7. Save script by clicking on Save icon and name worksheet as you wish.
8. Now click on Deploy then click New deployment.
9. Then a popup will appear. Now select type as web app, select who has access as anyone and then deploy.


After that there will be an Authorize Access popup, the goal is to allow our project to read, create, and delete files on Google Drive. Therefore, we just click Review Permission Select a google account click continue click on the words open your project name (not safe) below click allow. Finally, copy the link that you just created, later it will be used to retrieve JOSN data in our Google Sheet.

Let's create license in blogger

At this stage, you have to make sure that in the template that will create the license there is already a jQuery script Because the data will be retrieved using ajax, here there are two ajax that we have to create, namely ajax from feed/posts/summary to retrieve the blog ID and ajax from the google web app link that we just created to validate and match the data in google sheet with ID blog and license code.

If the blog has not installed jQuery please paste the given code above </head> code of your theme.
<script src='https://cdnjs.cloudflare.com/ajax/libs/jquery/3.5.1/jquery.min.js'></script>

10. Now go to blogger Menu » Theme » Edit Html . Copy and paste the below JavaScript before </body>.
<script>/*<![CDATA[*/
var urlBlog = 'https://www.blogtut.tech';
var license = $('#licensekey').text();
var notif = '<style>body{background-color: rgb(243, 245, 254)} #blogtut{align-items: center;background-color: rgb(255, 255, 255);border-radius:50px;display: flex;flex-direction: column;justify-content: center; margin:20px;max-width: 400px; padding: 30px;position: relative;} #blogtut h4{font-size:20px} #blogtut-timer { align-items: center;background-color: rgb(243, 245, 254);border-radius: 50px;border-style: none;display: inline-flex;font-size: 25px;height: 60px;justify-content: center;margin-top: 20px;outline-style: none;text-align: center; width: 60px;}</style><div id="blogtut"><h4>Activate Template!</h4><p>It seems like license key is invalid or kept blank, please enter valid license key to activate Template. </br>To get a license key, you can contact us at:</br> Website: www.blogtut.tech</br>Telegram:  @akpooniya</br>Thank you!  </p><span id="blogtut-timer">20</span></div>';
function nolicense() {
$(document.body).html(notif);
var mydiv = document.getElementById("blogtut-timer"),
time = setInterval(getcounter, 1000);
function getcounter() {
if (mydiv.textContent <= 0) {window.location.href = urlBlog;
clearInterval(time);
} else {
setTimeout(function() {
mydiv.textContent -= 1;
}, 1000);
}}}
$(document).ready(function() {
var dataLicense = license.split('-');
var codeLicense = dataLicense[0];
var arrayLicense = dataLicense[1];
console.log(codeLicense);
console.log(arrayLicense);
if (arrayLicense === undefined) {
nolicense();
}
str = [arrayLicense];
$.ajax({
url: "https://script.google.com/macros/s/AKfycbzh8mrRYTDBX23hSSXCmUtNhdDQ0X53gYZa-jWc9u-pwdFWOLLMai7iYwHlLuuOM1S1/exec",
type: "GET",
data: "users",
crossDomain: true,
dataType: "",
success: function(data) {var json = data.user;
var sheetLicense = json[str];
console.log(sheetLicense)
if (sheetLicense === undefined) {
nolicense();
}
var ID = sheetLicense.id;
var code = sheetLicense.code;
$.ajax({
url: "/feeds/posts/summary/?alt=json",
type: "get",
dataType: "jsonp",
success: function(data) {
var dataID = data.feed.id.$t;
console.log(dataID)
var IDblog = dataID.split('-');
var blogID = IDblog[1];
try {
var dataInBlog = blogID + codeLicense,
dataInSheet = ID + code;
if (dataInBlog === dataInSheet) {
return;
}
nolicense();
} catch (input) {
window.location.href = urlBlog;
}},});},});});
/*]]>*/</script>

Change https://www.blogtut.tech with your blogurl for redirecting when license is not valid or empty. Also change my web app script url https://script.google.com/macros/s/AKfycbzh8mrRYTDBX23hSSXCmUtNhdDQ0X53gYZa-jWc9u-pwdFWOLLMai7iYwHlLuuOM1S1/exec with your script url which you created earlier.


11. Now copy and paste the below widget code before <header code.

<b:section id='license' name='License' showaddelement='false'>
<b:widget id='HTML55' locked='true' title='License' type='HTML' version='2' visible='true'>
<b:widget-settings>
<b:widget-setting name='content'>Enter Your Valid License Key</b:widget-setting>
</b:widget-settings>
<b:includable id='main'>
<div id='licensekey'><data:content/></div>
</b:includable>
</b:widget>
</b:section>
<style>#licensekey{display:none!important}</style>

How to activate license for users

Go to your spreadsheet and fill Under id column put blogid of users blog and under code enter license code as you wish. Leave blank the first column named no.

Post a Comment

🤗 Hello, You Can Ask Your Queries Here. #SupportUs
Cookie Consent
We serve cookies on this site to analyze traffic, remember your preferences, and optimize your experience.
Oops!
It seems there is something wrong with your internet connection. Please connect to the internet and start browsing again.
AdBlock Detected!
We have detected that you are using adblocking plugin in your browser.
The revenue we earn by the advertisements is used to manage this website, we request you to whitelist our website in your adblocking plugin.